The best way to protect against breaches in your water storage tank is to monitor the tank for cracks, mineral deposits, sediment build-up, and other signs of wear and tear. While most tanks are built from strong materials like steel, fiberglass, or Food Grade polyethylene, none can be expected to operate indefinitely without proper maintenance.
How often you inspect your tank depends on where you live, how your tank is being used, and where it’s located within your property. But because most breaches form slowly over time, rather than suddenly by an earthquake or hurricane, it’s totally within to stop a tiny leak from turning into a devastating rupture.
Before we discuss ways to monitor and keep your water storage tank in top-top shape, we should look at the two primary ways a breach can occur.
Sediment build-up comes from mineral content in your water supply. It’s also made up of hard debris and solid matter that finds its way into your storage tank. It’s pretty much an inevitable part of owning a water storage tank, no matter how clean or tightly sealed it is. On its own this isn’t a huge problem, since sediment only really builds up at the bottom of the tank—far from the water at the top of the tank that gets pumped into your home.
The real problem is when too much sediment builds up, creating a breeding ground for bacteria and other pathogens that can find their way into your drinking water. As wet environments shielded from sunlight, water tanks are already the perfect habitat for microbial growth, and the occasional splash of chlorine can only do so much to limit contamination. That’s because sediment build-up shields pathogens from disinfectants. If left unchecked, sediment build-up can also pose a threat to the structural integrity of the tank itself, as it can weaken or erode the steel or polyethylene walls.
Hurricanes, earthquake, tornadoes, and other natural disasters are common causes for broken water storage tanks. Generally they are more difficult to protect against than sediment built-up, since they arrive without much warning and can puncture huge holes in your tank without much effort. More and more water storage systems are being designed to withstand significant environmental forces, but there’s still only so much you can do.
Even if your tank manages to survive a disaster unscathed, the water quality inside the tank may be compromised. In addition to causing structural damage, natural disasters—hurricanes, in particular—can inundate tanks with bacteria-infested storm water. Whether or not a storm or earthquakes creates a leak, you should take the opportunity to fully clean and sanitize your water tank.
Routine inspections of your water storage tank are critical if you want to have clean drinking water—let alone a storage tank that isn’t cracked or leaking. You don’t have to hire a professional to perform the inspection—you can do it yourself—but the process of cleaning and monitoring the tank for breaches depends in large part on the size of the tank, and whether or not it is accessible for hands-on cleaning.
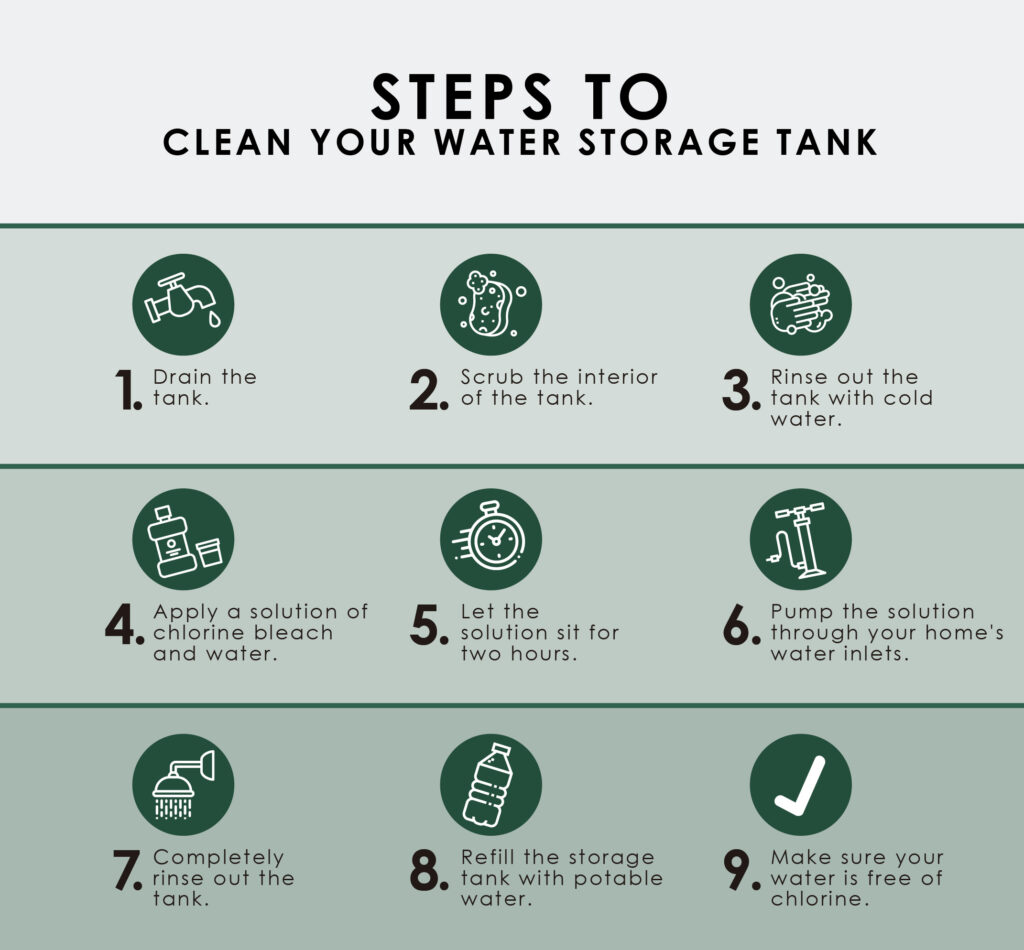
When it comes to sediment, experts recommend fully cleaning the storage tank every three to five years. Whether you’re hiring a professional or cleaning the tank yourself, here’s a brief rundown of the steps involved:
If your tank is not accessible to cleaning you can still sanitize the tank using household bleach. For more specific instructions based on the size and type of storage tank you own, follow the guidelines set forth by the World Health Organization.
While cleaning can fight against sediment build-up and prolong the lifespan of your storage tank, it is not a full guarantee that your tank will never suffer a crack, leak, or breach. As mentioned, hurricanes, earthquakes, falling trees, tornadoes, and other natural disasters don’t really care how well you’ve cared for your tank. Fortunately, though, you can always repair a leaky storage tank.
If you’ve found a crack or breach in your polyethylene water storage tank, you may be able to patch it up. One of the benefits of polyethylene is that it’s malleable, so unlike steel tanks, you won’t need welding equipment to plug a leak. Follow these steps to repair a crack in your plastic water tank.